Building a NES Emulator from Scratch
When people ask me what “embedded systems engineering” actually looks like, I point them to this project. In late 2023, I worked with a team of four engineers to architect a Nintendo Entertainment System (NES) emulator in Rust under a strict four-week deadline. The goal wasn’t just to make a game run; it was to replicate the architecture of a 1985 console (specifically the CPU, the PPU for graphics, and the mappers) while adhering to strict Rust standards like Enums and Traits.
Looking back, the project didn’t just happen all at once. It naturally evolved through three distinct phases: Simulation, Prototype, and a final Implementation where we hit, and ultimately solved, our biggest engineering roadblocks.
Phase 1: Simulation (The Headless CPU)
Before we could see Mario jump, we had to build the brain. In this first phase, “success” didn’t mean graphics; it meant passing unit tests and validating logic.
We started with the MOS 6502 CPU. The NES version of this chip is slightly special because the decimal mode is disabled, but otherwise, it requires implementing specific addressing modes and opcodes.
We spent the first sprint ensuring that our CPU could correctly handle the stack, zero-page addressing, and the program counter. At this stage, we weren’t running games, but rather running the tudelft-nes-test suite to treat the CPU as a pure logic puzzle and check our instruction accuracy. We also encountered “unofficial” opcodes (undocumented instructions that can cause the CPU to jam or crash). Initially, we simply skipped these to keep the simulation running by incrementing the program counter to avoid crashes, knowing full well this was a temporary fix that allowed us to move forward.
The Milestone: The CPU passed the unit tests. It was logically sound, but it was blind.
Phase 2: Prototype (First Light with NROM)
The Prototype phase is where you integrate your logic with the “real world”, or in this case, the PPU (Picture Processing Unit) and a physical game cartridge.
The NES is unique because the CPU and PPU run in parallel: for every CPU cycle, the PPU runs three cycles to draw pixels.
We started with the simplest setup called the NROM mapper (Mapper 0), which is straightforward because it has no bank switching logic, making it the perfect candidate for a prototype. When we finally hooked up the CPU to the PPU and loaded Super Mario Bros, it actually worked. Seeing the title screen was the defining moment of this phase because it proved the system could work, but a prototype is inherently fragile. When we tried to run other games, the limitations of our simple architecture became obvious immediately.
The Milestone: We could play Super Mario Bros and Pac-Man using the NROM mapper.
Phase 3: Implementation (The “Zelda” Crash)
This is where the project shifted from a standard implementation to a real engineering challenge. To reach a stable MVP, we needed to support complex games.
The major hurdle was the MMC1 Mapper. Unlike NROM, MMC1 allows games to swap memory banks (Bank Switching) because titles like The Legend of Zelda are larger than the NES’s limited address space. We implemented the bank switching logic, but when we loaded The Legend of Zelda, the emulator panicked and crashed.
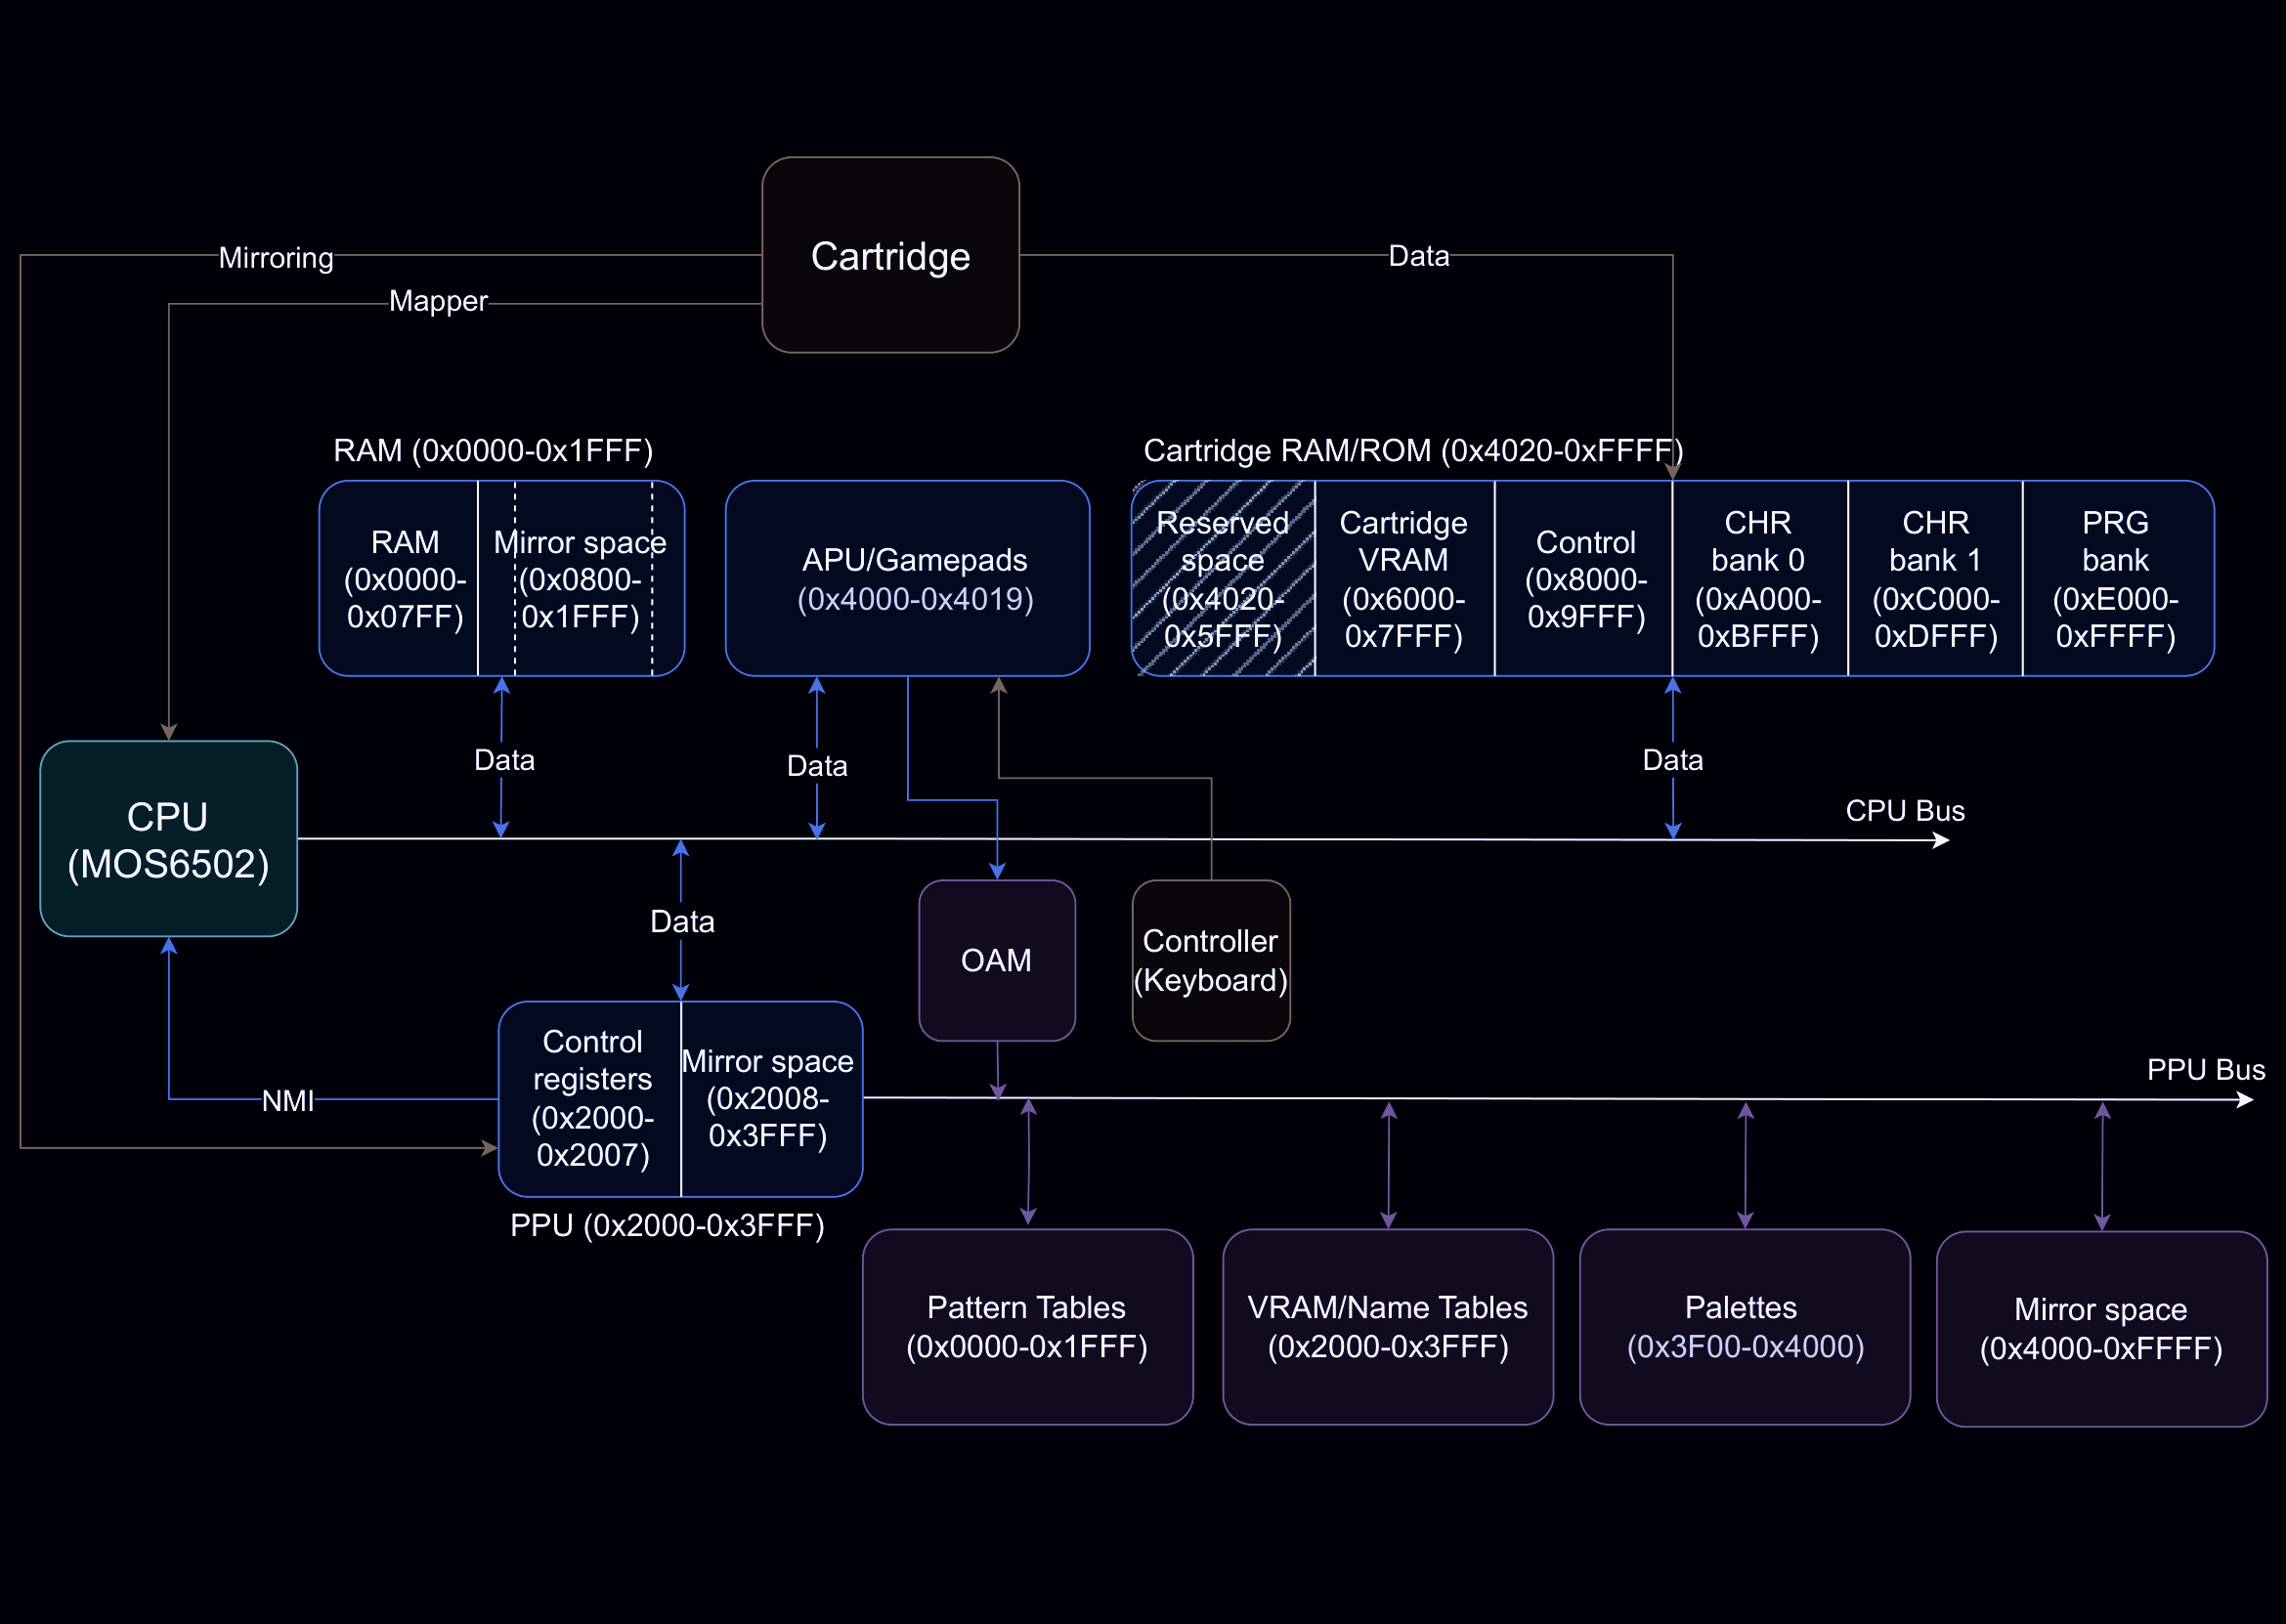 Figure: NES mapper architecture from the report, recolored to match the website palette.
This is the kind of bug that defines an engineer. The easy path is to say the game is broken and just play Mario, but the engineering path is to find the root cause.
We dug into the source code and found the issue wasn’t in our CPU at all, but rather in the PPU library we were using. The Legend of Zelda requires writing to CHR-RAM (Character RAM) to update graphics dynamically, yet the library didn’t support that feature.
To fix it, we had to:
- Fork the external PPU crate locally.
- Modify the library internals to allow writes to the CHR-RAM address space.
- Re-integrate it into our emulator.
Once we patched the tool, Zelda ran smoothly. We also circled back and properly implemented the illegal opcodes we had skipped in the simulation phase, ensuring high overall compatibility.
The Milestone: We weren’t just running simple demos anymore; we were running complex, bank-switching games that required modifying the underlying system tools to work.
Reflection: What Was Left Out?
We claimed this as an MVP, but we knew it wasn’t a finished “Product.” The most glaring omission was full audio. We built the APU (Audio Processing Unit) architecture by implementing the five channels: Pulse 1, Pulse 2, Triangle, Noise, and DMC.
The logic was all there (reading and writing to the registers at 0x4000 through 0x4017), however, syncing that generated audio data to the host machine’s speakers proved too complex to finalize within the strict timeline.
If we were to do this again, we would have spent less time diving headfirst into coding and more time planning the Git strategy and architecture upfront. But that, too, is part of the engineering learning curve.
Project Links
- GitHub repository: malladi2610/Rust-basics-with-project